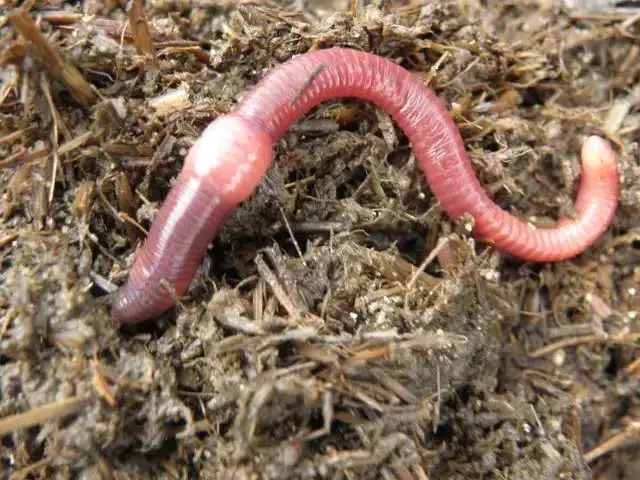
Hi my name is Shar. I am a Vermiculturist which is a breeder of Eisenia Fetida the species name for Red Wiggler Composting Worms. I always have Red Wiggler Composting Worms available all year long. If this ad is still up I do have worms available.
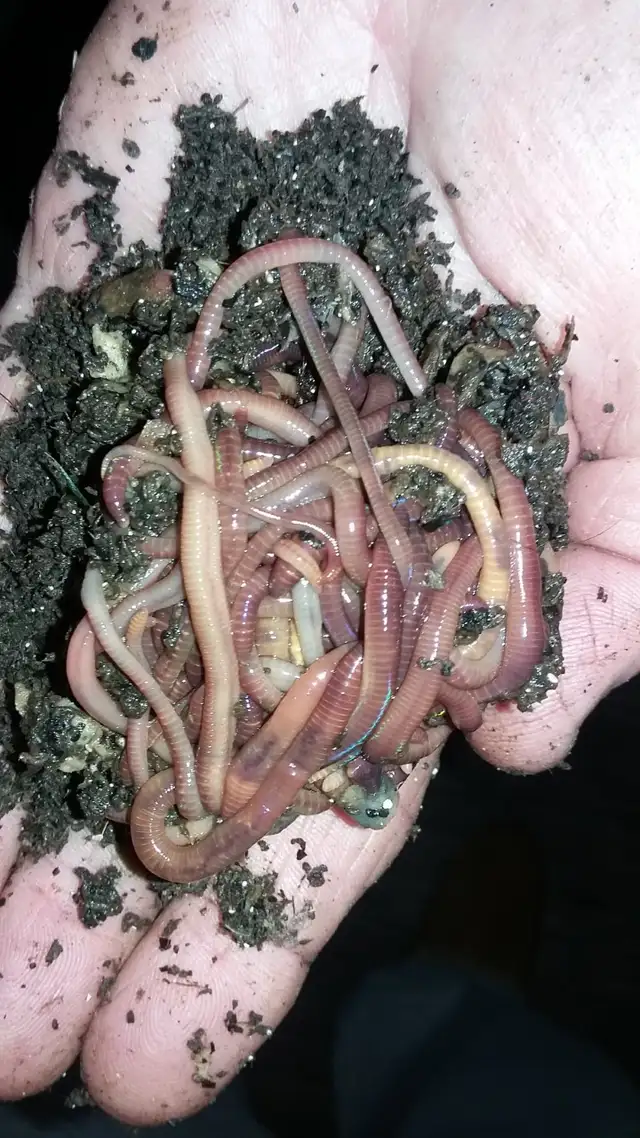
100 healthy, hand counted RED WIGGLER COMPOST WORMS (Eisenia Fetida) lightly packed with active, mature vermicompost/worm castings in an upcycled 500 ml container which contains all you need to inoculate, and kick start your new sterile worm bin with the necessary microorganisms, beneficial bacteria and fungi for ONLY $10 each! That's right 100 Red Wigglers (Mature Breeders, juveniles and babies) in active vermicompost for ONLY $10! Is all you have to decide is how many containers of 100 Red Wigglers you would like to buy.
Buying worms the way I sell them in their natural, active, mature, habitant that is bursting with microbes is actually a "grab and grow your worm bin" set up, and all you have to do to start is a container and nice moist carbon, like shredded cardboard for bedding. Over time the microbes and the worms will consume the bedding and all the kitchen scraps you feed and you will be left with a worm bin FULL of worm castings for your growing needs.
When you order composting worms online they are shipped in peat moss, and become stressed and try to escape the worm bin. When you buy your worms from me the worms remain in some of their own bedding that will inoculate your bin quickly so that your Reds can start consuming food quicker! (SEE BOTTOM OF THIS AD ON HOW TO ORDER VIA TEXT) ...keep reading on how to make a DIY worm bin and worm care.
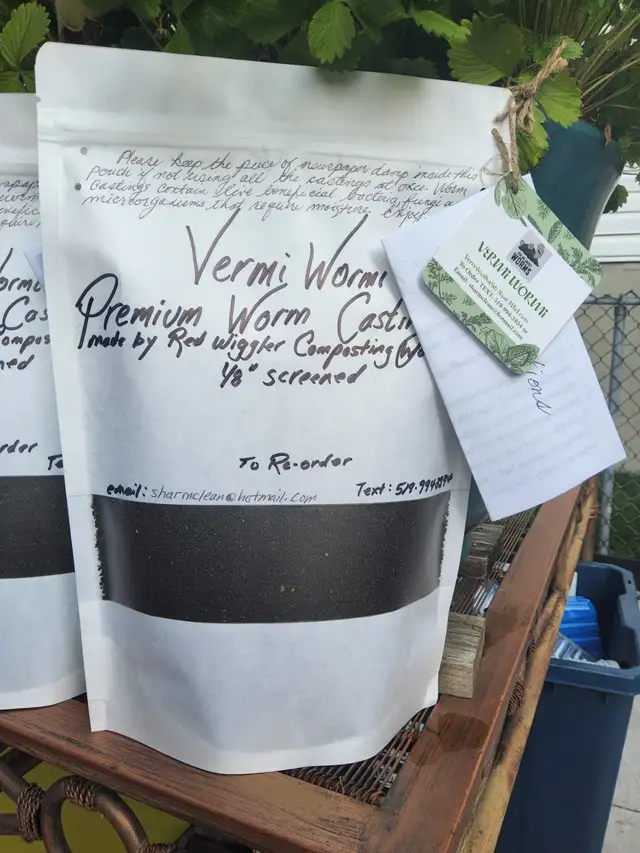
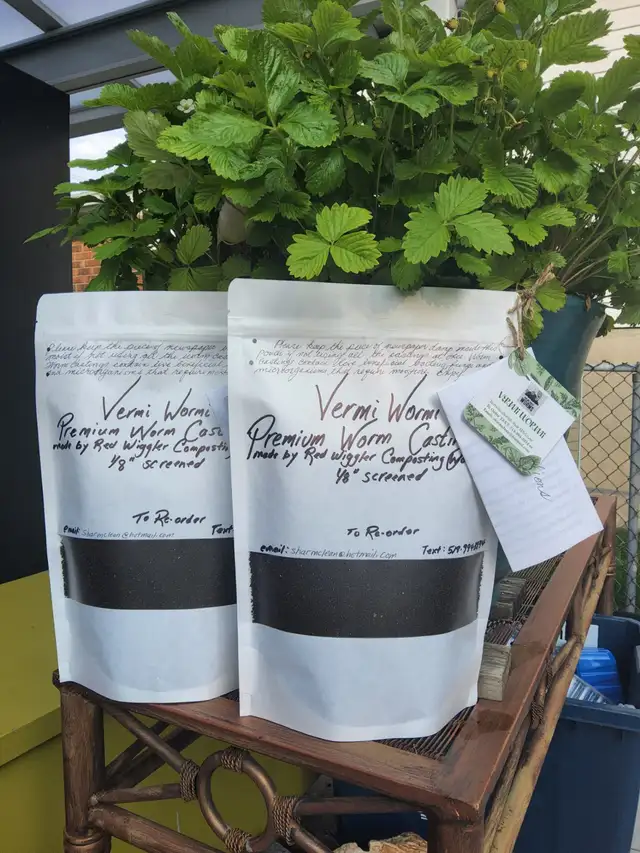
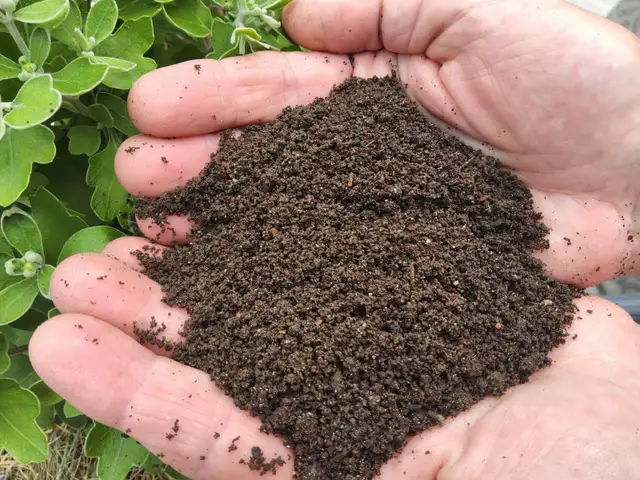
ALSO 4 SALE: PREMIUM 1/8" screened WORM CASTINGS 1L STAND UP POUCH FOR ONLY $5 EA. Freshly harvested JUST FOR YOU! Great for indoor plants. The worm castings are moist and highly active. Worm castings can be added to a potted plant by taking a handful and scratching it into the surface than water. The plants roots can readily uptake all of the worm castings goodness. (see pics # 7,8 9 in this ad for worm casting quality and packaging)
Start vermicomposting indoors today with Red Wiggler Composting Worms and you will have some nice worm castings for your garden, trees, bushes, lawn, plus your houseplants or to make aerated worm castings tea know as "worm tea" within 2-3 months. Worm castings are easy to store and keep fresh, just ask me how, I'll gladly tell you! So start a worm bin today, it is fun, easy, educational, and your plants will love you when you use the fresh, active worm castings in your indoor and outdoor gardening, heck worm castings are even great to get a lush, green lawn!
If you have a slow outdoor composter, add 2 containers of 100 Red Wigglers and the contents of the 500 ml container they come in and the microbes will break the food down for the worms to slurp out and change it all to worm castings. Red Wigglers cannot be added to a hot compost, until the compost has cooled down to 85F. If your compost is slow, just make sure to moisten well, and add some more moist carbon before adding the worms and they will do all the work, you won't even have to turn it. Since there is so much available food in a slow composter and so much available space, the Red's will breed like crazy increasing their population to deal with your slow composter.
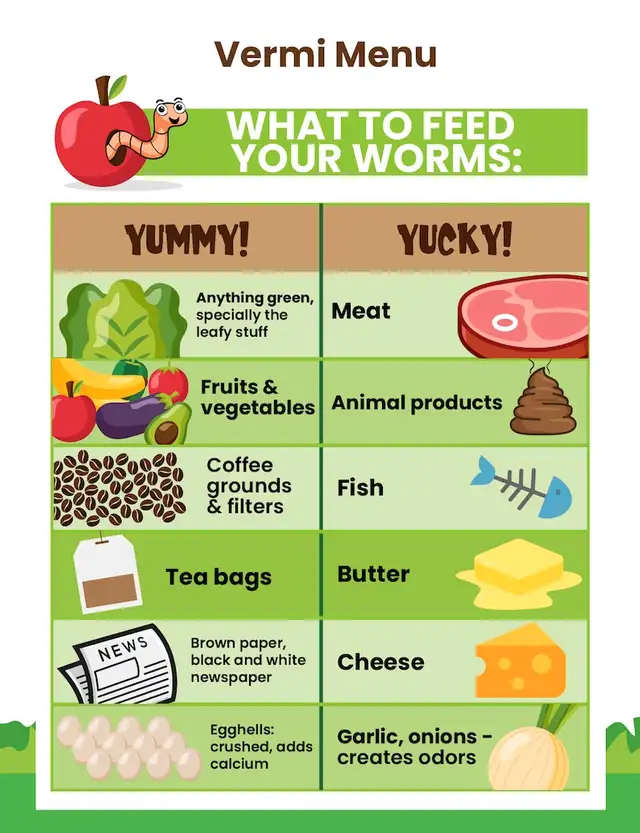
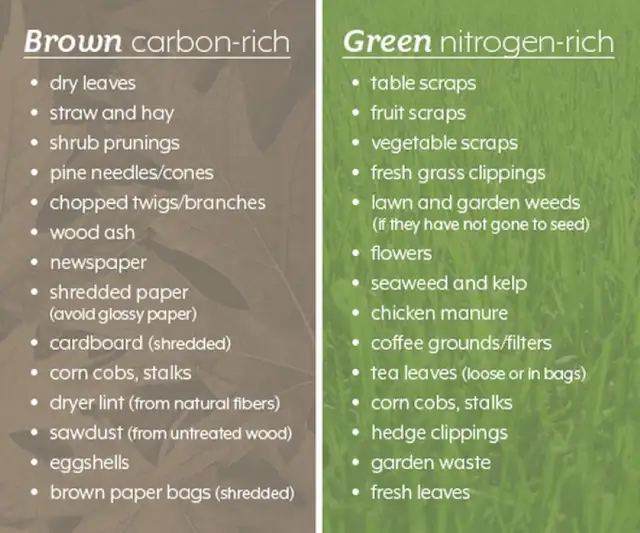
Quit throwing out your kitchen scraps, plant debris, dead plants and outside garden waste into the City's green bin, and all your carbon waste you place in recycling like cardboard boxes, scrap paper, junk mail, Amazon boxes, egg cartons, paper drink trays from take out food shops all these things could all be free food for your worm bin, and the worms will provide you will worm castings so that your soil becomes living soil. Red Wigglers love fall leaves, and consume carbon (browns like the ones mentioned above) and nitrogen (greens like your food scraps, used coffee grounds, tea bags, garden waste including stems and leaves and they even like weeds!
For only $10 you can purchase a 500ml sized container that has 100 Red Wiggler Compost Worms (breeding mature adults, juveniles and babies plus cocoons) along with 500 mls of their own "living" inoculated bedding from my worm bins so that when you bring your Red Wigglers home you can simply dump the container on the top of your own sterile worm bin's bedding, and the contents will immediately start inoculating your worm bin with beneficial bacteria, microorganism, and fungi and that will be the beginning of your journey in vermicomposting. It is best NOT to vermicompost meat, dairy, citrus, onion, hot peppers and oils but you can throw these things into your City's "green" compost bin.
Making a worm bin is fun and educational for the whole family, and everyone can learn a lot about worms, and how worm castings (worm poop) is the world's best way to bring soil back to life with good beneficial bacteria, fungi, microorganisms, and minerals, plus worm poop/castings have humus, growth hormones and helps your plants immune system and assists in controlling pests. Worm castings are immediately taken up by your plant's root system and worm castings will not burn your plants/roots PLUS, all plants love WORM CASTINGS! Every household should have a worm bin, heck, everyone with indoor and outdoor plants, trees, shrubs and lawn should have a worm bin either inside or in the spring, summer and fall have one outside, It is so easy to do and instead of throwing out your kitchen and garden waste you could be feeding these items to your worm bin!
Everyone with chickens, horses, rabbits, or cows should consider vermicomposting with Red Wigglers as these animals' manures are excellent food sources for compost worms, the only other things you would need is a worm bin (a Rubbermaid tote work well for this) some Red Wigglers and a carbon source to use as bedding. Over a period of 2-3 mths the worms even consume the carbon bedding. The carbon to nitrogen ratio in vermicomposting is 70:30,
Cannabis/Marijuana growers, you NEED to try worm castings, as they will simply amaze you.
Vermicomposting is odorless, as long as the worms are not overfed. The idea is to feed the worm bin so that the worms can break it down before the food begins to rot. The more worms you have the faster this happens. Only feed the worms enough that they can consume it over a period of 5-7days. If you accidentally overfeed the bin, it is a simple to fix by simply adding more dry carbon.
Vermicomposting has a carbon to nitrogen ratio of 70:30, The idea is not to have your worm bin heat up like a hot compost vermicomposting is a cold process. The carbon is called "browns" in regular composting and in vermicomposting, and the carbon is used to make the worm's bedding. The worms will consume bedding over time and turn it all into worm castings. The bedding gives the worms a safe place to sleep, reproduce and to get away from the kitchen scraps if it does accidentally heat up from decomposing.
You can make the worm's bedding from any carbon source like shredded newspaper, egg cartons, shredded or pieces of cardboard, dry fall leaves, maple shavings, hay or straw, Tim Horton take out drink trays, coco coir, or peat moss. Compost worms love carbons, but no shiny cereal boxes or glossy paper, or shiny cereal those are best put to use in your city's paper recycling blue box. In Ontario the inks used on cardboard and paper are soya based so they are fine to use in your worm bin. The glues in the cardboard are vegetable starch based and the worms love it! Over time the worms and microbes in the worm bin will consume and break down everything you put into the worm bin, and you will have a bin full of active, mature, worm castings which are ready to use on all of your plants, gardens, trees, shrubs and lawns. A worm bin is the World's Best Identity theft prevention....the worms will consume all your old paper bills/receipts/old paper income tax returns and turn it all into valuable worm castings. Worms can do all this work with NO odour! IF, you worm bin ever lets off an odour, it is a sign that something is wrong, and the solution is always easy, simply add some dry carbon, and if the worm bin is too dry, add moist carbon. Red Wiggler Compost worms do NOT live in or consume soil. Red Wigglers are epigeic worms which means they live above the soil in the leaf litter. Even in their native environment they DON'T live in soil, they live ABOVE the soil in the moist leaf litter and consume decomposing organic matter. Red Wigglers do not burrow down in the soil like earthworms. Earthworms live in the burrows ALONE in solidarity and only come to the surface to breed and collect a bit of different food than soil like a leaf. Red Wigglers live in what is called a "clew" (a herd of worms), they are very social and love to share space with each other. For their size Red Wigglers consume a lot of food, but only use a small amount to live on, and their unique digestive system has their own set of enzymes and microbes that quickly breaks down the organic feedstock you give them and transform it into worm castings that are not only readily available to plants, but it brings your soil alive with active microbes and fungi, so that your growing soil can become alive again as it was meant to be.
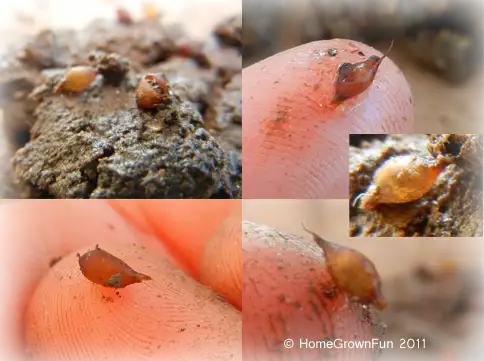
Red Wigglers like to produce a lot of new members to their "clew" and when they breed both worms will make a cocoon each. Mature adult worms with a fully developed clitellum will produce 2-5 cocoons each week. Each cocoon could have 2-20 baby worms inside that will begin to emerge from the cocoon in 21-28 days. When the little wisps (baby compost worms) emerge they are so small that they can literally hide in the grooves of my finger print. In 50-60 days the wisps will grow and mature and develop a clitellum and now they too are ready to add to the worm population! Compost worms will self regulate their own population.
Worms don't have lungs, they breathe through their skin, so they require the carbon bedding to be moist at all times. Worms don't have teeth, so they require "grit" for their gizzard which is part of their digestive system, just like chickens do. The grit acts like teeth grinding the food in the gizzard with the help of the worm's muscles.
MAKING YOUR OWN DIY WORM BIN:
It's easy to make and manage a worm farm bin. You just need to chose a container with a lid, like a shallow, dark coloured, plastic Rubbermaid tote with a lid. If you watch YouTube videos online, you sometimes see that folks use 2 totes inside each other. Personally, this is totally unnecessary, as when one vermicomposts managing the moisture, the worm bin is healthier and not so wet. With a 1/8" drill bit, drill some holes for air exchange around the top of the tote, but do not drill holes in the lid if you will be ever planning on putting your worm bin outside as the rain will get in it through the holes in the lid and could drown the worms. To make your bedding you need to decide on one or many sources of carbon. I use shredded cardboard, shredded newspaper, dry maple leaves and maple wood shavings. Some common carbon sources for worm bin bedding are: shredded paper/carboard, broken up egg cartons/take out drink trays/dry leaves/old paper receipts/coco coir/peat moss/straw/hay/horse manure. Remember worms breathe through their skin so you have to get the carbon moist. Bedding should always feel like a damp sponge, or like how your clothes feel when you take them out of the washer. Put the carbon bedding in a pail or container of unchlorinated water (I use melted snow, my aquarium water, well/lake or pond water or rain water) to soak for 5-10 mins. Grab a handful of the wet bedding and squeeze out the water until only 1-2 drops of moisture is left in each handful, (the bedding should feel like a damp sponge), then place it into your new worm bin. Keep repeating until you have about 4-5 inches of damp bedding in your new worm bin. Fluff up then bedding.
Now contact me (Shar) to order your Red Wiggler Composting Worms. Is all you have to decide is how many 500 ml containers of 100 Red Wigglers lightly packed in mature, active vermicompost you would like to buy . Each 500 ml container with 100 Red Wigglers is $10 each. Each 100 worms will consume about 1 heaping handful of cut up kitchen scraps every 5-7 days. The more worms you have the faster you will have a worm bin of worm castings.
If you have any compost you can add a handful of fresh compost to your worm bin and this be "food" for the worms and the microbes. If you happen to have a handful of kitchen waste, you could add it to the new worm bin as well. Since in their natural environment Red Wigglers live in leaf litter I always suggest covering the bedding with a damp piece of newspaper or a damp 100% natural fibre worm blanket such as an old tea towel, hand towel or old 100% natural fibre t-shirt. This will help to make the worms feel safe. Lastly add a sheet of dry cardboard over the newspaper to darken it out. Compost worms are photophobic, they do not like light, as they have sensors on their heads to let them know when there is light and when they sense light they go deep into the bedding to get away from it. In their natural environment light would be from the sun which they instinctually avoid as they sense it will kill them by drying them out.
Once you pick up your order of Red Wiggler worms from me you simply dump the contents of your container/s of the red Wigglers along with all the active vermicompost on to the top of your worm bin's bedding and allow the worms to find their own way into the bedding. I use the lid for the Rubbermaid bin for about the 1st 1 and 1/2 mths, then I remove the lid from the tote and replace it with a piece of bubble wrap, bubbles facing down and place it over my bedding to help give more air. One does not have to do this, if there is a build up of moisture on the sides of the worm bin at this time you can simply drill more holes in the worm bin for better air exchange and to help reduce humidity. When their is a build up of moisture on the bin walls, the worms will go for a tour on the sides of the bin, but they won't try to get out, as they require moisture to breathe and they have sensors on their skin so they can detect the dryness if they tried to climb out.
Worms have a gizzard so they NEED grit for digestion. The gizzard is part of their digestive system, and since they have no teeth, the gizzard grounds up all the food using a small hard substance known as grit along with the worm's muscles so that the food can enter their intestines. You can use very fine, freshwater play sand as grit, it has to be fine enough to fit in the worm's small mouth. However the best grit to use is a grit containing calcium (egg shells finely ground to a powder, like flour). Calcium not only acts as grit but is also a pH buffer, so if your bin turns too acidic from feeding kitchen scraps, a form of grit with calcium in it will also acts as a pH buffer bringing the bin's pH back to neutral which is the healthiest for your worms. Worms have calciferous glands that use calcium to keep their blood pH neutral, rid their tissues of CO2, it helps in reproduction, and with the making of cocoons. Grit has to be able to fit into the worm's mouth. dolomite lime, Pulverized egg shells, powdered agricultural, garden , calcium carbonate, oyster shell powder, or glacier rock dust are all excellent sources of grit for your worms and these sources make a great pH buffer to keep your bedding from turning acidic (low pH) from decomposing kitchen scraps. Most folks that vermicompost save up and dry out eggshells, then grind them with a coffee bean grinder, or a blender like a Magic Bullet or NutriBullet, so that the shells turn into a fine powder that resembles the consistency of wheat flour and they use this as grit and also it works as a pH buffer when used with each feeding........ or you can make it all really easy by buying some Worm Grit & pH Buffer from me with your worm order, see below:
WORM GRIT and pH BUFFER 4 sale: 300 grams of powdered Agricultural Lime in an upcycled container for ONLY $3 each. Powdered Agricultural Lime contains mostly calcium carbonate, and also has magnesium in it. It is easy to apply to your worm bin. Just add a little sprinkle of Agricultural Lime over each feeding and this will provide enough grit for your worms. plus it helps to prevent the carbon bedding from turning acidic. One 300 gram container is enough for 1 worm bin from start to the harvesting of your worm castings. Order one 300 g container of Agricultural Lime with your worm order for only $3 ea.
100 Red Wigglers will only consume about 1 handful of cut up kitchen scraps with a light sprinkle of grit every 5-7 days. When you feed the worms kitchen scraps wait until the last feeding is almost gone or completely gone before adding more food.
I freeze my excess kitchen scraps in a large plastic freezer bag as this helps to break down the cellular walls of the food making it mushier so that the worms can slurp it up, but one does not have to freeze the kitchen scraps, freezing just speeds up the process, plus it prevents one from overfeeding a worm bin if you have more scraps than worms. The more mature a worm bin becomes it starts to build up a colony of beneficial bacteria, microorganisms and fungi, which helps to break down the kitchen scraps so that the worms can consume them, plus the worms also consume the microbes. A good practice is to fluff the bedding before feeding, and if the food is gone or almost gone feed again. If there is still food there leave the bin a few more days. When you fluff the worm bin, you can take note if the bedding is still moist or too wet. If it is too wet, then add a handful of dry carbon to the top of the bedding,
FEEDING THE WORMS:
Since you are buying Red Wiggler worms from me, this means with each 100 Red's you will get 500ml of their own vermicompost in the container which means your new sterile carbon bedding will be inoculated with beneficial bacteria and microbes so that you can begin feeding the worms the day you buy them. To feed the worms, make a shallow hole in the bedding, add the same volume of DRY bedding into the shallow hole, place a handful of cut up kitchen scraps for every 100 Red Wigglers, sprinkle on some grit, then fill the hole with your worm bin's existing bedding. Place the damp newspaper back over the bedding to keep it moist, add the sheet of cardboard for darkness, and put the lid back on. Repeat this process every week, but before you feed them check to make sure the last feeding is almost gone or gone. If it was totally gone, then you could feed a bit more. Once the worms begin breeding they will consume more food and if you get into the practice of fluffing the bedding before feeding you will notice how quickly the food is going and can add a bit more once you notice. Be patient it takes a bit of time for the worm bin to build a good eco system. Your worms will be happy, have lots of food, as they also eventually consume all that carbon you put in as bedding, and the mature worms will begin making cocoons, and your worm population will grow into your container. The worms will naturally stop producing cocoons when the population gets too dense, that's right, they self regulate their population!
Within 2-3 months your worm bin will be full of worm castings, and increased population of Red's and it will be time to harvest the worm castings to use and start a new worm bin again using your own population of worms. Some folks, split their worms at this point and start 2 worm bins, but you do not have to do this.
Now is the time you just have to decide how many containers containing 100 Red Wigglers and 500 ml of mature, active vermicompost you want to start your new worm bin with. I recommend starting with at least 2-3 containers which would be 200-300 Red's if you have 1-2 in your household, and another 100 for each family member and if you aren't going to make your own pulverized eggshells to use for grit and as a pH buffer remember to order 1 containers of 200 grams of Calcium Carbonate from me at $3 ea. along with your worm order.
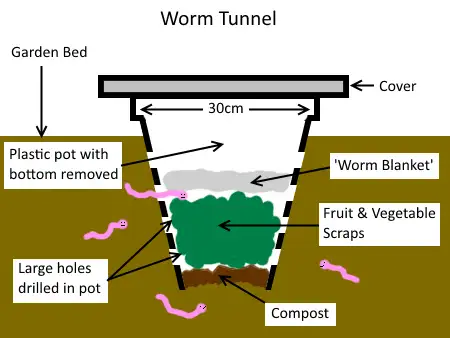
Check out picture #10 in this ad, and you can make your own worm tunnel for your garden, A worm tunnel is kind of like a worm bin, or a food station for your garden where you can feed your worms (plus native worms) food scraps, garden waste along with 70% moist carbon bedding. You can use something like a 5 G pail with a lid, and drill 1/8 to 1/4" holes in the bottom and many holes along the sides, but not in the lid. You will have to find a shady spot in the garden and dig a hole to accommodate the pail. Bury the pail leaving 2-3 " of the top of the pail above the soil line. If you have a hot glue gun and some black landscape fabric, from the inside of the pail, cover and glue strips to cover ONLY the holes above the soil, as this will prevent snails from entering the pail. The worms will come and go out of the pail. Adding 100-200 Red Wigglers will be great in the pail, and feed it regularly by adding a handful of dry carbon, some grit and the same volume of kitchen scraps. Do not drill holes on the lid. Secure the lid with a large rock to prevent predators from opening it. You can also cut up garden waste for the pail, just remember to keep the pail contents moist and add dry carbon with each feeding. If the compost inside heats up, the worms have sensors on their body and they will leave through the holes into the soil and return when the "meal" cools down. This will also attract earthworms that live in your garden, and they will help to aerate the garden as they come and go from the pail. In late fall, fill the pail with lots of dry leaves, 1 last meal, some grit and cover the top of the lid with lots of leaves. The red's may die off but they will make plenty of cocoons that will emerge in the spring after frost. I run Red Wigglers in my plastic cone shaped compost bin under a tree in my backyard for over 4 yrs now. Many adult Red's survived the Kitchener winter!!
Start your own worm bin today and you will have your own bin full of BLACK GOLD worm castings in a couple of months.
The great thing about worms is that they are easy, and once you have your bin set up, there is absolutely NO COST! Plus there are literally millions of videos online and on YouTube to learn from.
All this for only $10 for each 100 Red Wigglers along with 500mls of active vermicompost. Vermicomposting is a clean process, with no smell, that allows you to feed the worms your kitchen scraps and then they will produce humus full of humic acid, microbial and nutrient-rich worms castings, the perfect soil amendment for your garden or indoor plants. Use some worm castings to make an ultra-concentrated aerated worm castings tea, perfect for reviving your houseplants or the garden, and amending any soil.
Red wiggler worms offer great benefits to the organic gardener, producing both a natural fertilizer, an effective pesticide, and strengthen your plants immune system, plus it will make your soil, "living" soil! The value of red wigglers, a.k.a. Eisenia Fetida, lies in their excrement, known as worm castings. Start a vermicomposting worm bin indoors, or in the shade outdoors today. You can even add some Red's to your outdoors compost bin. The rewards are having your own fluffy worm castings.
Red Wigglers are also a great high protein live feed source for many pets you may have. I feed the Red's to my large goldfish. Red's contain high protein value and share a pretty close nutritional profile with salmon, high in Omega Fatty acids. Lots of folks use Red's to feed chicken, ducks, reptiles, axolotls and aquarium and pond fish. You can start a worm bin and have an endless supply of high protein live feedstock.
Now just figure out how many 500 ml containers of 100 Red Wigglers you need to buy. They are $10 ea. If you have any questions do not hesitate to ask.
PICK-UP location: Heritage Dr Kitchener between Lorraine and Ottawa St N.
**NOTE~ Sometimes email responses from OKz.ca end up in your junk folder. If you have not heard back from me please check your junk or spam folder of your email.
To order please respond to this ad through OKz.ca OR TEXT Shar @ 519-994-3834
Please include in your message/text:
1./ Your name.
2./ How many 500 ml upcycled container/s of 100 Red Wigglers in mature, active vermicompost you would like to order, $10 ea
3./Do you need some WORM GRIT and pH BUFFER: 300 grams of powdered Agricultural Lime in an upcycled container for ONLY $3 each
4./How many 1 L stand up pouches of PREMIUM 1/8" screened WORM CASTINGS for ONLY $5 ea would you like to order? (see pics # 7,8,9 in this ad for worm casting quality)
5./When would you like to pick up your order, date and approx time?
NOTE: I am generally available from 11 a.m- 9p.m. daily and weekends, but if you need to come earlier or later, please let me know as I may be able to accommodate your request.
Your plants will love you!
YOU WILL LOVE YOUR PLANTS!
Thanks~ Shar
The YouTube video included on this ad were made by my worm farmer friend, and YouTuber, Francisco Cabas. The videos are we done, offer great info, but there are lots of different ways you can vermicompost, just Google it or on YouTube watch a bunch of different vermicomposters that raise Red Wigglers and pick you own style. IT IS SOOOO FUN!!! Happy worm farmin'.
When you call please mention you found this ad listing on OKz.ca
Contact Information
| Address | : | Kitchener, ON N2B 3K9 |
| City | : | Kitchener / Waterloo |
| Phone | : | 519-994-XXXX (Show) |
| Asking Price | : | $10 |
Other Information
| For Sale By | : | Owner |
| Condition | : | New |
| Payment | : | Cashless Payment,Cash Accepted |